Remove Background vs Manual Editing (Which is Better?)
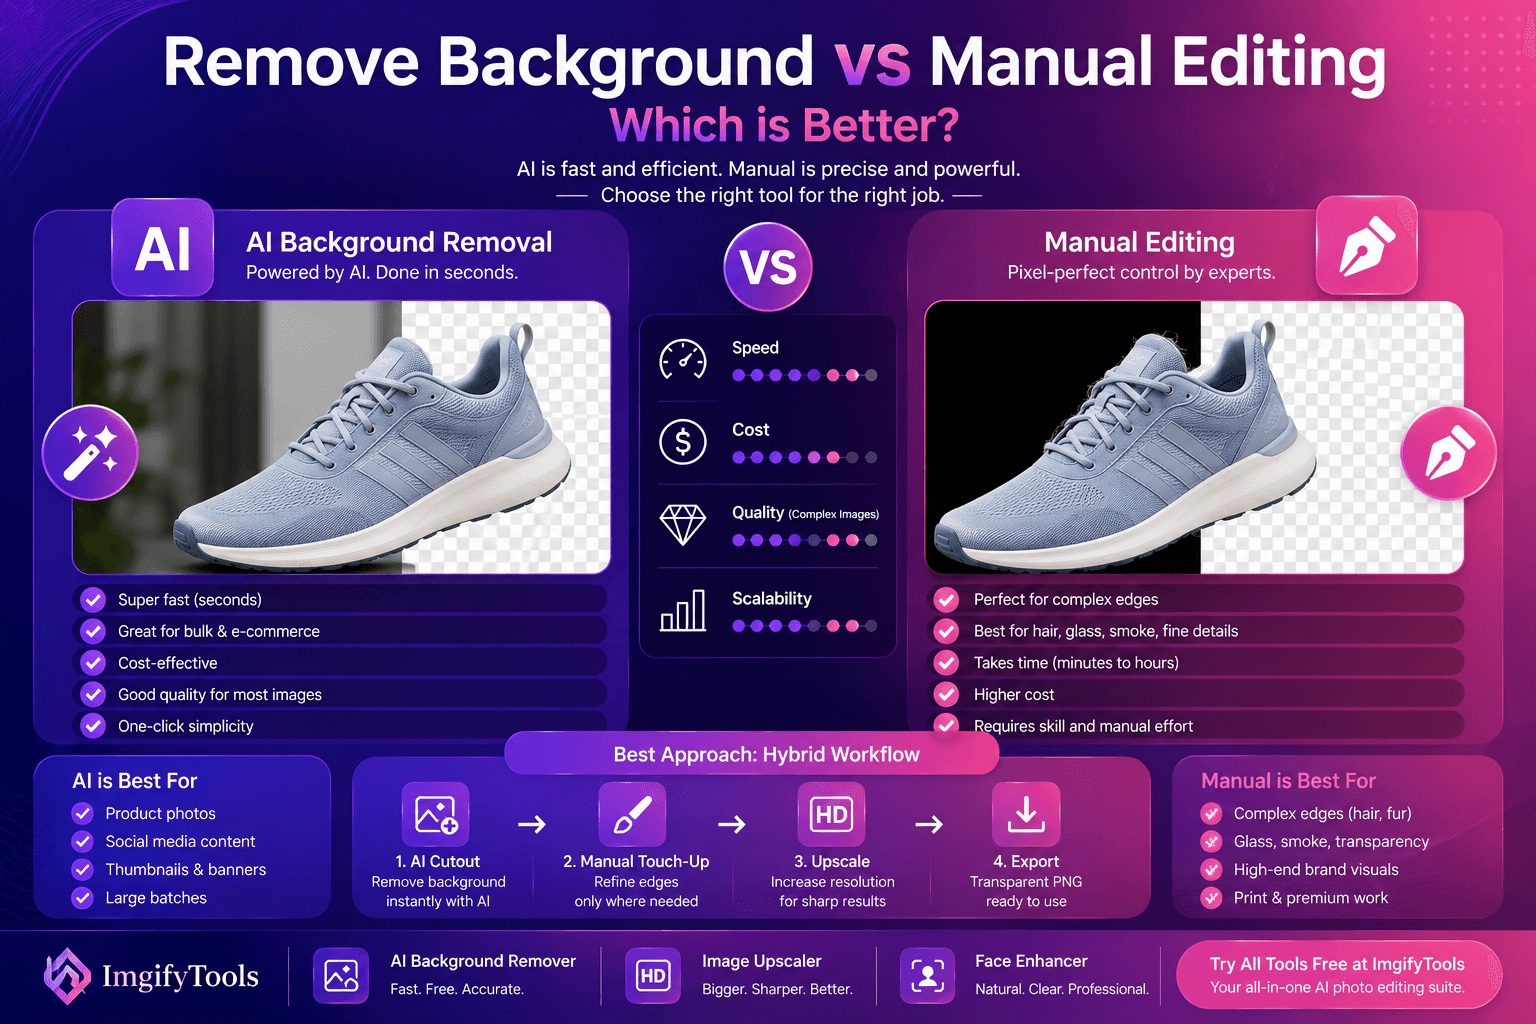
If you’re deciding between remove background vs manual editing, you’re really deciding how to spend your time and budget. AI background removal is fast and improving every year. Manual editing is still the gold standard for the hardest images. The best answer in 2026 is not “one or the other.” It’s choosing the right method for the job—and using a hybrid workflow when it makes sense.
This comparison is written for creators, freelancers, and e-commerce users who want results that look professional.
Quick answer (featured snippet)
AI background removal is best when you need speed and consistency for most everyday images.
Manual editing is best when accuracy matters for complex edges, transparency, or high-stakes brand assets.
What AI background removal is great at
AI background removers shine when:
- the subject is clear and separated from the background
- you need many cutouts fast (catalogs, social posts)
- you want a clean transparent PNG without detailed retouching
If you want to test how good AI is on your images, try our free AI background remover and zoom in on edges around hair and product borders.
H3: AI is especially strong for e-commerce
For online sellers, consistency matters more than “perfect.” AI tools help you:
- standardize backgrounds
- reduce editing cost
- publish faster
That speed often translates directly into more listings, more experiments, and more sales.
What manual editing is still best at
Manual editing wins when you have:
- complex transparency (glass, smoke, veil)
- highly detailed hair against similar background colors
- fine patterns (mesh, chain-link, intricate objects)
- luxury or brand-critical visuals (premium ads, large print)
Manual tools allow a skilled editor to control edges precisely, but it takes time.
Side-by-side comparison (practical)
Speed
- AI: seconds
- Manual: minutes to hours
Cost
- AI: low (often free to start)
- Manual: high (time, labor, or subscription tools)
Quality (realistic expectations)
- AI: very good on common images, less predictable on edge cases
- Manual: best possible, consistent with expert skill
Scalability
- AI: easy for batches
- Manual: scales poorly unless you hire a team
Real examples: which method should you choose?
If you’re still unsure, these common scenarios make the answer clear.
Scenario 1: 50 product images for an online store
- Best choice: AI background removal
- Why: speed + consistent catalog style
- Upgrade path: manual touch-ups only on the few hard images
Scenario 2: a premium ad creative for a luxury brand
- Best choice: manual editing
- Why: edge cases, perfect realism, brand risk
Scenario 3: a creator thumbnail with a person’s face
- Best choice: AI cutout + cleanup
- Why: speed matters, and the “clean subject” look performs well
- Add-on: use our face enhancer so the portrait stays sharp and natural
Scenario 4: glass, smoke, or a wedding veil
- Best choice: manual or hybrid
- Why: real transparency needs careful control
The hybrid workflow (best of both)
Here’s what many professionals actually do:
- Use AI background removal as the starting point
- Touch up only the difficult areas manually (when needed)
This approach saves huge time while keeping quality high.
H3: When the hybrid approach makes sense
Use hybrid when:
- you need quality for 20% of the hardest images
- you have tight deadlines
- you need consistent catalog results without spending all day masking
A practical workflow for creators and sellers
Step 1: Remove background with AI
Start with AI to generate the cutout quickly.
Try our free AI background remover and export a transparent PNG.
Step 2: Upscale if the image is small
If the subject looks soft, the edges won’t be clean.
Use our image upscaler to increase resolution and recover clarity.
Step 3: Enhance faces (if people are involved)
For portraits, manual sharpening can look harsh.
Use our face enhancer to improve facial clarity in a natural way.
Step 4: Final polish and export
Resize for your platform and compress carefully.
For format decisions and trade-offs, MDN is a reliable reference:
MDN: Image formats
When AI background removal fails (and how to handle it)
AI can struggle when:
- the subject blends into the background (low contrast)
- the image is heavily compressed
- there is motion blur or noise
Fixes:
- choose a better source image if possible
- upscale first to give the model more detail
- accept a softer edge for difficult areas
H3: The “reshoot” decision (sometimes the best answer)
If you control the photography, a quick reshoot can beat hours of editing:
- use a simple backdrop
- increase subject/background contrast
- add even lighting
Better inputs make both AI and manual methods faster.
What competitors don’t tell you
Many comparison posts pretend manual editing is always “best.” In reality:
- most projects don’t need perfect edges
- most teams can’t afford manual masking for everything
- speed often matters more than perfection
The “best” method is the one that helps you publish consistently.
External sources (authority)
For deeper understanding and best practices:
FAQs
Is AI background removal as good as Photoshop?
For many common photos, AI results are good enough and far faster. For complex transparency and high-end brand assets, manual editing still wins.
Which is cheaper: AI or manual background removal?
AI is usually cheaper and faster. Manual editing costs more time or money.
Should I upscale before removing the background?
If the image is tiny or blurry, yes—upscaling first can improve edge quality.
Why do AI cutouts sometimes have halos?
Halos happen when the original background color bleeds into the subject edges. Higher-quality images reduce this.
What’s the best workflow for e-commerce product photos?
AI background removal for speed, then standardize backgrounds and export consistent sizes. Upscale only when needed.
CTA: Choose the faster workflow with ImgifyTools
If you want to remove backgrounds quickly and still keep a professional look:
- Try our free AI background remover for clean cutouts
- Use our image upscaler when resolution is too low
- Enhance portraits with our face enhancer for natural clarity
Upload an image now and see how fast you can ship better visuals.
Conclusion
In the remove background vs manual editing debate, the winning strategy is practical: use AI for speed and scale, use manual editing only for the hardest edge cases, and combine both when quality matters. That’s how modern creators and sellers keep quality high without slowing down their business.
