Resize Images for Social Media (Complete Guide)
If you want to resize images for social media and still keep them sharp, consistent, and professional, you need more than a random resize tool. Social platforms crop, compress, and reformat your images. That’s why posts sometimes look blurry, text gets cut off, or product images lose detail.
This complete guide gives you a practical workflow for creators, freelancers, and e-commerce users who want clean visuals that perform well across platforms.
Why resizing is more than “change width and height”
There are three reasons social images fail:
- Wrong aspect ratio → platform crops important parts
- Low resolution → image looks soft on modern screens
- Over-compression → blocky artifacts and muddy text
Featured snippet: best workflow for social images
Resize to the correct ratio → upscale if needed → export cleanly → compress lightly
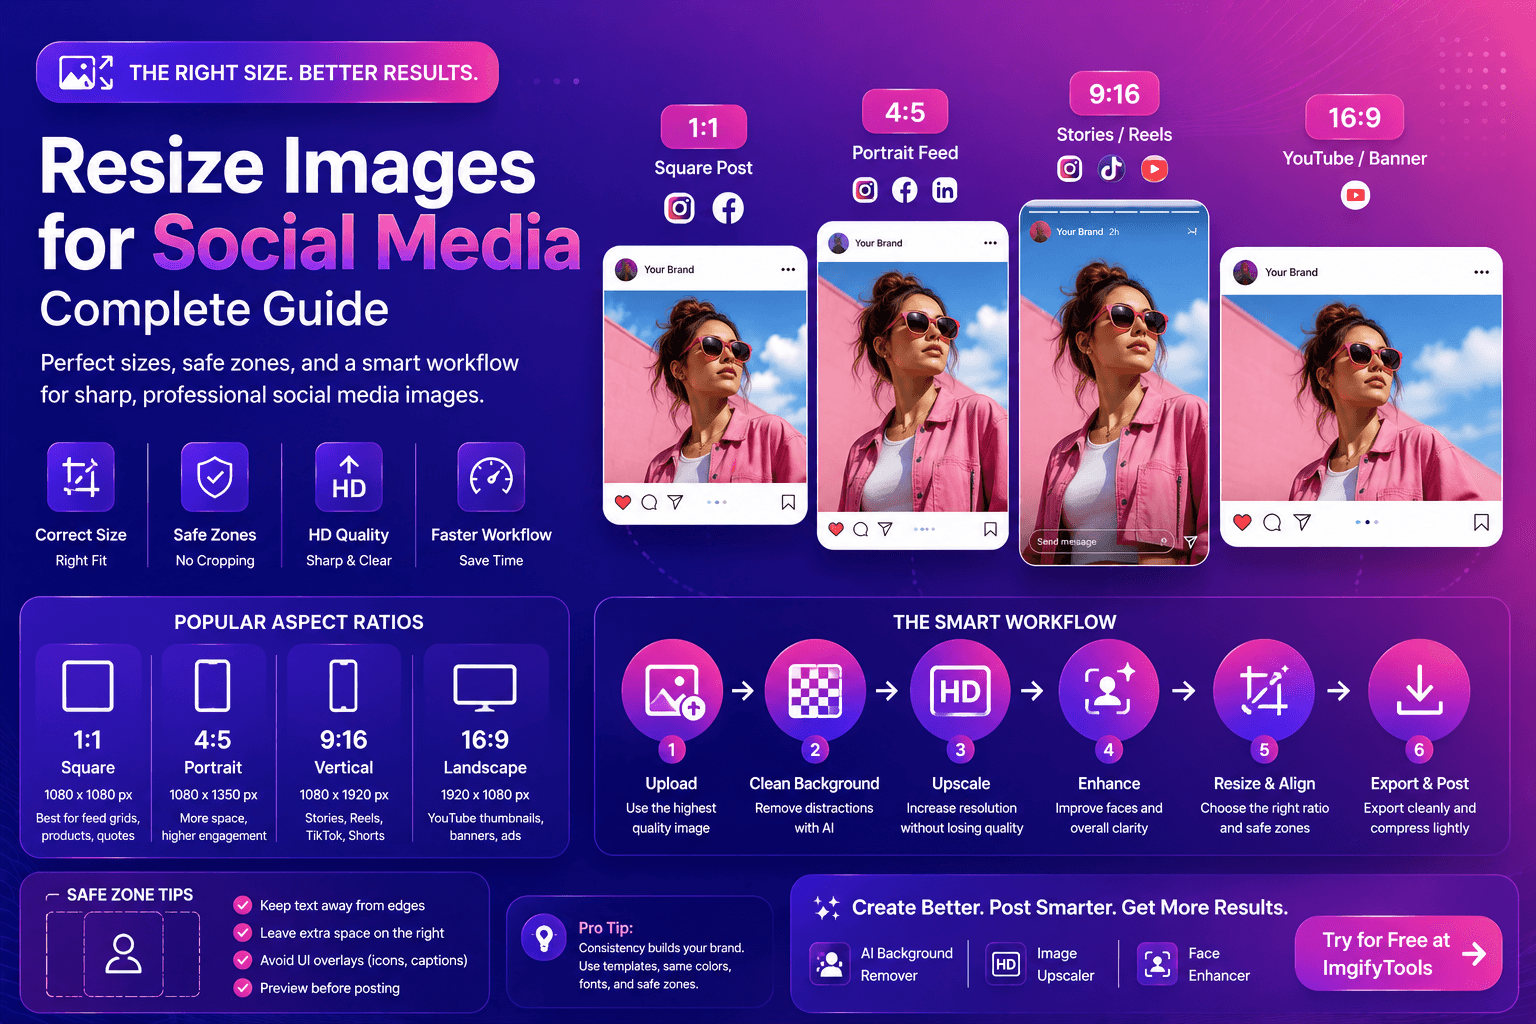
Common social media aspect ratios (quick reference)
Sizes change over time, but these ratios are widely used:
- 1:1 (square)
- 4:5 (portrait feed posts)
- 16:9 (landscape/video thumbnails)
- 9:16 (stories and short-form vertical)
Instead of memorizing numbers, memorize ratios. Ratios protect your composition even if platforms tweak resolution.
Social media “safe zones” (what most people forget)
Even with the correct ratio, text and faces can get covered by UI elements (icons, captions, buttons). A safe zone is the area you keep “important” content inside.
H3: Safe zone rules of thumb
- Keep faces and text away from the very top and bottom in vertical formats
- Leave extra space on the right side where icons often appear
- Avoid placing small text near the edges (it gets cropped first)
If you design templates, create one safe-zone overlay and reuse it.
Step-by-step: resize images for social media (clean results)
1) Choose the platform and placement first
Ask: where will this image appear?
- Feed post
- Story/reel cover
- Ad creative
- Profile banner
Each has different “safe zones,” especially when UI overlays (buttons, captions) appear.
2) Fix the subject first (background and clarity)
Before resizing, clean the image. This avoids resizing artifacts.
For most creator workflows:
- Try our free AI background remover to isolate the subject for thumbnails and ads.
- If your image is small, use our image upscaler before resizing.
- For portraits, enhance faces with our face enhancer to keep clarity on small screens.
3) Resize using a composition-first approach
When resizing, don’t just squeeze the image. Decide what matters:
- keep the subject centered
- keep text away from edges (safe zone)
- leave breathing room for overlays
4) Export for social platforms (avoid quality loss)
Most platforms accept JPEG/PNG and will re-compress. Your goal is to upload a clean file that survives their compression.
Use these general rules:
- Photos: JPEG or WebP (high quality)
- Graphics/text-heavy: PNG (or lossless WebP)
For a clear breakdown of formats, see:
MDN: Image file types and formats
5) Compress carefully (don’t destroy text)
Compression matters because social platforms compress again. If you upload an already heavily compressed file, quality collapses.
Best practice:
- export once at high quality
- keep file size reasonable
- avoid multiple re-saves as JPEG
web.dev explains why heavy images impact performance and user experience:
web.dev: Image performance issues
Platform-by-platform tips (practical)
- Portrait formats tend to hold attention longer in feed.
- Keep text away from the top/bottom edges (UI overlays).
TikTok / Reels
- Vertical is default.
- If you’re creating covers, protect the subject from being covered by icons.
YouTube thumbnails
- Use high contrast.
- A clean cutout often performs better than a busy background.
- Try our AI background remover to isolate faces/products for bold thumbnails.
- Keep it professional and readable.
- Avoid over-saturated edits.
- Use face enhancement subtly for headshots.
Tips to make resized images look sharper
Resizing can soften detail. These tips help:
- Upscale first if the source is small
- Avoid resizing up by huge amounts
- Export with high quality settings
- Don’t compress aggressively before uploading
H3: The “small text” problem
If your image includes small text:
- increase font size in the design
- export in PNG or high-quality JPEG
- avoid over-compression (text becomes muddy)
Quick presets you can reuse (featured snippet)
If you want a simple, repeatable system:
- Square preset (1:1): profile grids, simple product posts
- Portrait preset (4:5): feed posts with more screen coverage
- Vertical preset (9:16): stories, reels, TikTok
- Landscape preset (16:9): YouTube thumbnails and banners
Use the preset that matches the placement, then adjust composition.
Internal linking ideas (CTA-style)
When building social workflows, these three tools cover most needs:
- Try our free AI background remover for clean thumbnails and ads
- Use our image upscaler to increase resolution before resizing
- Enhance portraits with our face enhancer for creator profiles
External resources (authority)
For image best practices that affect social + web:
FAQs
What is the best size to resize images for social media?
Use the correct aspect ratio for your placement. Ratios (1:1, 4:5, 9:16) matter more than exact pixels.
Why do my images look blurry after uploading?
The platform compresses your image. Upload higher quality and avoid pre-compressing too much.
Should I upscale before resizing?
If the image is small, yes. Upscaling helps preserve clarity after resizing.
Is PNG or JPEG better for social media?
JPEG is usually best for photos. PNG is better for text-heavy graphics or transparency.
How do I keep my subject from being cropped?
Use safe zones. Keep key elements away from edges and test the preview before posting.
CTA: Create better social visuals with ImgifyTools
Want a faster workflow?
- Try our free AI background remover to create clean cutouts for thumbnails and ads.
- Use our image upscaler to increase resolution and keep posts sharp.
- Enhance faces with our face enhancer for creator profiles and headshots.
Upload your image now and build a consistent social style.
Conclusion
To resize images for social media properly, think in workflows: fix the subject first, resize to the correct ratio, export cleanly, and compress carefully. When you combine resizing with AI tools (background removal, upscaling, face enhancement), your visuals look more professional—and that usually means better attention, better clicks, and better results.
You may also like

How to Remove Image Backgrounds with AI (Fast, Clean Results)
Learn how AI background removal works, when to use it, and how to get pro cutouts for e‑commerce and social—plus tools to upscale and enhance portraits.
Read next →

Compress Image Without Losing Quality (Best Methods)
Compress images without losing quality using practical methods for web and e-commerce. Learn formats, settings, and a simple workflow for fast, sharp results.
Read next →
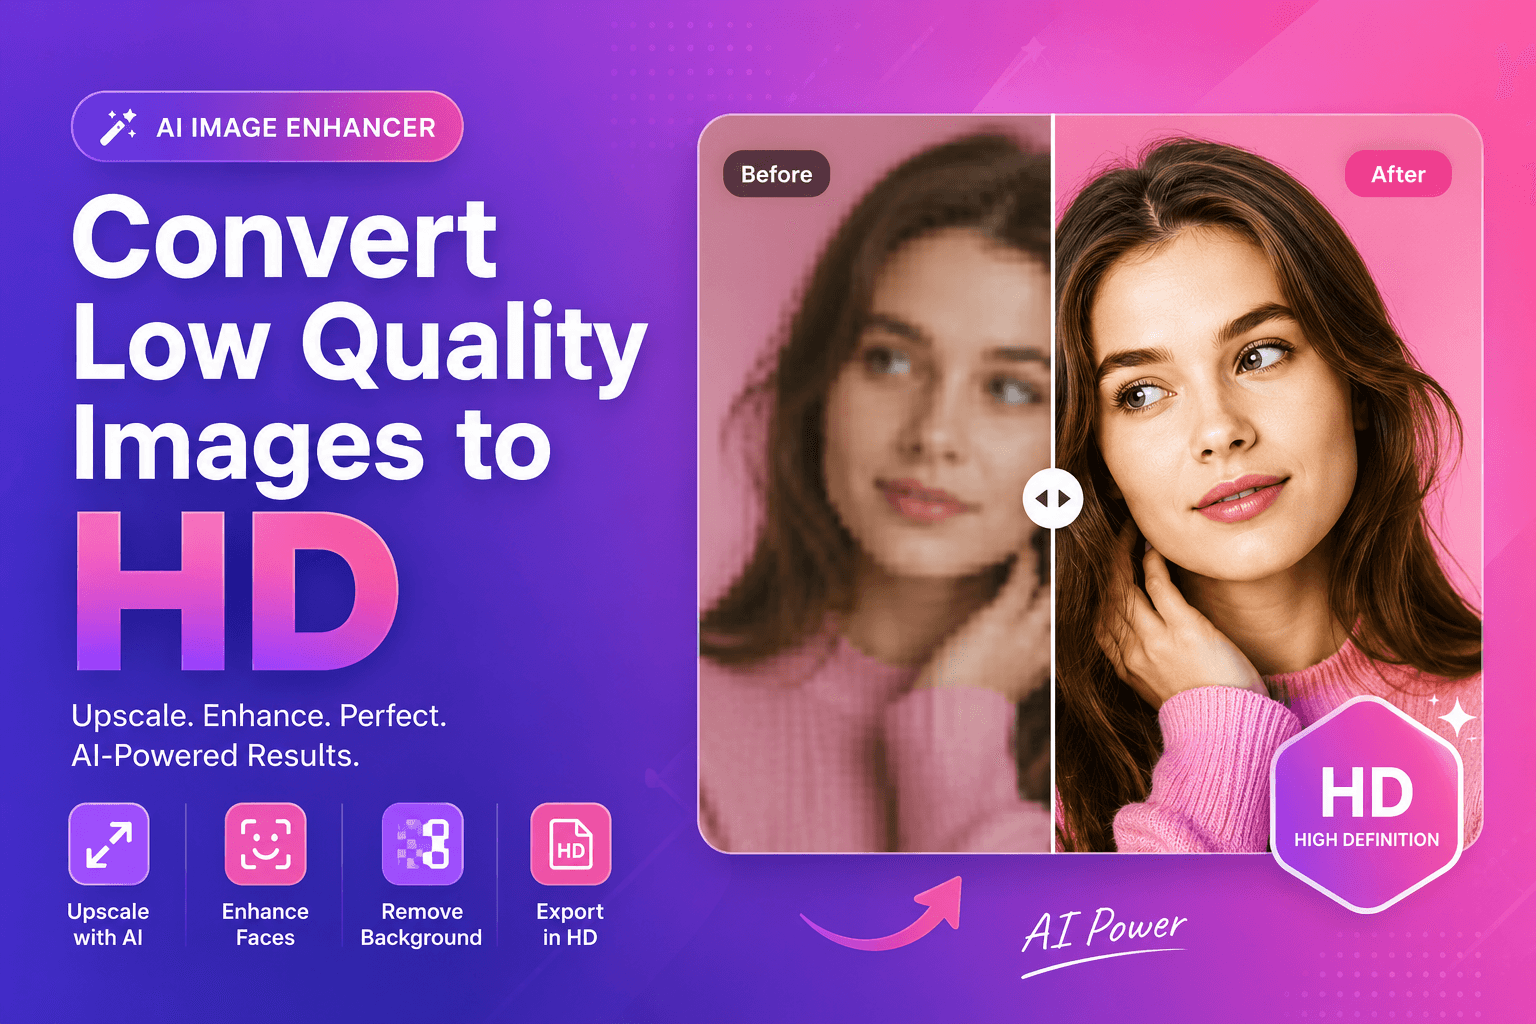
Convert Low Quality Images to HD (AI Method)
Convert low quality images to HD using AI. Learn a clean step-by-step workflow to upscale, reduce artifacts, and improve faces and cutouts for real use.
Read next →